Friday, September 23, 2011
HIBERNATION
It has been a while since I last posted anything on this blog, and....... honestly it will probably be quite a while before I will likely post again. There are too many things going on so I am cleaning house and reducing the number of things I will devote my time and attention to. This blog didn't make the list.......
Sunday, July 31, 2011
1ST ANNIVERSARY SALE!
SALE! SALE! SALE!
I opened the Cabochon Designz on-line shop on Etsy.com on July 31, 2010, listed my first items on August 1st and made my first sale about 45 minutes later while I was still entering new listings into the store. It has been a very good first year and a great learning experience.
To celebrate everything is on sale at 20% off for the next two weeks!
Click here for immediate retail shopping therapy and take advantage of the bargains!
Thanks to all for making Cabochon Designz a success.

Friday, July 15, 2011
Zuni Fetish by Ricky Laahty
It's about rocks - just not my rocks. The A:shiwi people of Northwest New Mexico, whom we know as the Zuni, have a rich artistic tradition including pottery, silversmithing and the carving of small stone animal figures called fetishes. There are many well known carvers working in both older traditional styles, modern realism style and contemporary whimsy. Ricky Laahty is one the very best active carvers whose work is instantly recognizable to collectors. His whimsical frogs are famous for their facial expressions, comical bodies and incredibly expressive eyes. About 90% of Ricky's work is frogs with the remainder being a variety of the significantly important figures of the Zuni fetish tradition - bears, eagles, turtles, mountain lions, owls, badgers, etc.
These two fetishes are part of my personal collection. The Ocean Jasper owl was carved from a rock from my holdings that was provided to Ricky for the carving. The frog is carved from dark amber. Both are just a little over an inch tall. True rock art.


These two fetishes are part of my personal collection. The Ocean Jasper owl was carved from a rock from my holdings that was provided to Ricky for the carving. The frog is carved from dark amber. Both are just a little over an inch tall. True rock art.


Ricky is known for adding a bonus carving to the back or bottom side of many of his carvings.
This fish is the bottom of the frog...... really!

This frog carved from Borneo amber is not part of my collection, but the amber was provided to Ricky by a friend - Marks Fossils of Baltimore, MD

Monday, June 27, 2011
MAKING IT RAIN!
1/2 an inch of rain so far this year. You heard me right - 1/2 and inch of rain since January 1. Yes, this is the desert, but we usually do get a few inches of rain in the winter and spring, June is always dry and then the monsoon rains in July and August bring us several inches each month.
Subconsciously I am really yearning for the rain to come. Occasionally I make cabochons in the shape of a teardrop or raindrop - lately I have been cranking them out. Didn't actually realize that trend.


Subconsciously I am really yearning for the rain to come. Occasionally I make cabochons in the shape of a teardrop or raindrop - lately I have been cranking them out. Didn't actually realize that trend.


I CAN'T WAIT FOR THE RAIN TO COME!!
Saturday, June 4, 2011
Pearls & Coral
I do really like cutting and polishing cabochons in my workshop..... bringing out the beauty in the stone. But I almost never see what my stones become a part of once I've sold them to a jewelry artisan. It's a real thrill to see a finished piece of jewelry featuring one of my cabochons. This delicate necklace features an Indonesian Fossil Coral trillion stone I made combined with sterling silver and pearls. I think it's awesome and really gives me a lot of pleasure to see one of my creations become something greater.


Saturday, May 7, 2011
Sonora Sunrise - Custom piece
I was asked if I could drill holes in a stone. Well - I'm not really equipped to do a good job at drilling, only having a Dremel hand power tool and 1.5mm diamond drills to work with. No drill press to ensure a straight hole, no water flow to keep the diamond tool cool. Anyway.... here are a few images to show the transformation from the rough cut slab to a finished double sided Sonora Sunrise cabochon


Saw cut slab, rough ground. You can see the ink line at the edge and two dots where the holes will go.

The slap is 6.5mm thick - thin for such a large cab - especially double sided

finished - one side

the other side
Sunday, April 24, 2011
Making an Ammolite Pendant - part 2
So.........
The Ammolite has been coated with epoxy and is now fully hardened and cured. On to the final finish.
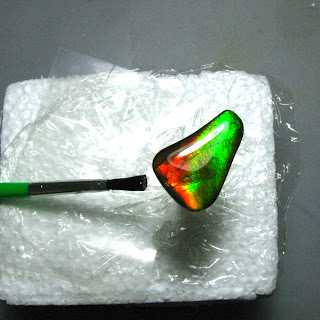
17. Remove the Ammolite and stick from the Styrofoam block and while firmly holding the doublet, grasp the stick up close to the stone and snap the stick off.


The Ammolite has been coated with epoxy and is now fully hardened and cured. On to the final finish.
17. Remove the Ammolite and stick from the Styrofoam block and while firmly holding the doublet, grasp the stick up close to the stone and snap the stick off.

Lots of epoxy on the bottom and the drop of super glue too.
18. Grind off the epoxy and super glue using a medium rough wheel on a flat lap with plenty of water. I use a 320 dot pattern diamond lap because the epoxy does not 'load' the wheel and flushes away in the water readily.

be sure to use plenty of water and don't let the epoxy get too warm

After sanding off the epoxy. It's back to the way it was when you glued on the stick
19. Done! Most pieces I make I sell as is - either to jewelers who set them in gold or silver, or to wire wrappers who work in gold or silver also. Occasionally I glue a silver or gold bail directly to the backing to make a nice clean simple pendant, as I have done here.

Silver bail attached with a small drop of epoxy
THE FINISHED PIECE!

Photos of Ammolite never capture how stunning they really are.
The color flows in waves as the stone moves.
mmm..... I think I will keep this in my collection for now...... maybe a future gift for someone who takes pride in my work.
....... and remember. "It's never too late to be what you might have been" (George Eliot). I am trying to be proof of that.
Saturday, April 23, 2011
Making an Ammolite Pendant - part 1
I'd mentioned in an earlier post that ALL Ammolite MUST be either clear epoxy coated capped with clear quartz glass to protect the thin, soft, easily flaked aragonite sheets of color.
Here is how I make epoxy coated Ammolite doublets.
1. Spend an inordinate amount of time looking at the piece of Ammolite rough you have selected to work on. Look and look some more - savor the potential the piece has. Have a cup of coffee, take a walk, dig in the garden, look at the selected piece some more......... and then some more.........
2a. Select one of your awesome pieces with a natural backing of about 2-4mm of the host gray shale and carefully sand the top face to remove any shale stuck to it. This is definitely the type of work where the old lapidary adage "grind a little and look a lot" is the way to go. Even more awesome now? Good. Carefully grind the outside shape of the stone and polish the top face up to 14,000 mesh diamond. Your ready to coat your finished stone.
2b. Select one of the thin flakes you have, which may be double sided, and try to decide which might be the top. Repeat step 1 with this one piece only.........
3. Carefully - very carefully - sand the top and bottom surfaces with a 320 or finer Nova wheel using lots of water. Take your time - you are going at it too aggressively....... I know..... especially if you are used to doing lapidary work with agates, jaspers, and the like. Do not grind the edges in an attempt to shape the piece in any way.
4. OK.... if the flake of Ammolite you are working with is double sided, the inevitable problem now is - both sides of the flake are awesome! Now what do I do? Repeat step 1, of course. One side is going to have to be sacrificed and glued to backing. I use black jade.
5. Sand the bottom side as nearly flat as you dare on a flat lap. A lot of Ammolite, most I think, undulates somewhat so a thin flake may not be capable of being ground dead flat - don't worry about it. Stop when you are too worried to go further.
6. Select a piece of backing (black jade) 2-4mm thick. It does not have to be polished. In fact a rough surface is better for the epoxy to adhere to. Mix a small amount of two part epoxy ( I use Hughes 330) and color it black with lamp black powder (traditional and messy) or color it the way I was taught by Joe DiPetro - use a couple of very small drops of real India ink from an art supply store. Coat the stone thinly with the epoxy and drop the Ammolite flake onto the backing by placing the edge of the flake onto the backing at a 45 degree angle and letting go of the stone so it drops down like closing a book. This pushes out the air and minimizing getting air trapped between the Ammolite and the backing. Move the flake around with a finger tip or the erasure on the end of a pencil. Apply a little pressure, but not too much. The flake will slip around easily at first, but as the glue layer is squeezed thinner it begins to act stickier and the flake will become more difficult to move. Be sure the stone is level while it cures. Epoxy, when first mixed is fairly thick, but actually gets thinner for a period of time due to the chemical reaction going on, before it hardens. If the stone is not level the flake will slide right off the backing when your not looking. Check it after about 10 minutes to be sure it has not moved. Let it cure for at least a day.


Here is how I make epoxy coated Ammolite doublets.
1. Spend an inordinate amount of time looking at the piece of Ammolite rough you have selected to work on. Look and look some more - savor the potential the piece has. Have a cup of coffee, take a walk, dig in the garden, look at the selected piece some more......... and then some more.........
2a. Select one of your awesome pieces with a natural backing of about 2-4mm of the host gray shale and carefully sand the top face to remove any shale stuck to it. This is definitely the type of work where the old lapidary adage "grind a little and look a lot" is the way to go. Even more awesome now? Good. Carefully grind the outside shape of the stone and polish the top face up to 14,000 mesh diamond. Your ready to coat your finished stone.
or
3. Carefully - very carefully - sand the top and bottom surfaces with a 320 or finer Nova wheel using lots of water. Take your time - you are going at it too aggressively....... I know..... especially if you are used to doing lapidary work with agates, jaspers, and the like. Do not grind the edges in an attempt to shape the piece in any way.
4. OK.... if the flake of Ammolite you are working with is double sided, the inevitable problem now is - both sides of the flake are awesome! Now what do I do? Repeat step 1, of course. One side is going to have to be sacrificed and glued to backing. I use black jade.
5. Sand the bottom side as nearly flat as you dare on a flat lap. A lot of Ammolite, most I think, undulates somewhat so a thin flake may not be capable of being ground dead flat - don't worry about it. Stop when you are too worried to go further.
6. Select a piece of backing (black jade) 2-4mm thick. It does not have to be polished. In fact a rough surface is better for the epoxy to adhere to. Mix a small amount of two part epoxy ( I use Hughes 330) and color it black with lamp black powder (traditional and messy) or color it the way I was taught by Joe DiPetro - use a couple of very small drops of real India ink from an art supply store. Coat the stone thinly with the epoxy and drop the Ammolite flake onto the backing by placing the edge of the flake onto the backing at a 45 degree angle and letting go of the stone so it drops down like closing a book. This pushes out the air and minimizing getting air trapped between the Ammolite and the backing. Move the flake around with a finger tip or the erasure on the end of a pencil. Apply a little pressure, but not too much. The flake will slip around easily at first, but as the glue layer is squeezed thinner it begins to act stickier and the flake will become more difficult to move. Be sure the stone is level while it cures. Epoxy, when first mixed is fairly thick, but actually gets thinner for a period of time due to the chemical reaction going on, before it hardens. If the stone is not level the flake will slide right off the backing when your not looking. Check it after about 10 minutes to be sure it has not moved. Let it cure for at least a day.

Glued and cured. Note the rough saw cut finish on the black jade backing

The flake is less than 0.5mm thick. The backing is about 3mm thick
7. Cut the excess backing away using a diamond blade trim saw. Cut close to the Ammolite but leave a little margin to grind off.

Close but not too close

Trimmed and ready to grind
8. Grind the black jade backing to the edge of the Ammolite. Carefully shape the stone to your liking.


9. Polish the top face up to 14,000 mesh diamond.

10. Sand the bottom edge of the backing to remove the sharp edge

11. Glue a small dowel to the bottom using a small drop of thick or gel type super glue.

Note the final outside shape and the rounded bottom edge
12. Cover a piece of styrofoam block with plastic wrap and stick the dopped stone into the block. Make sure the stone is even and level - never mind about the stick - the stone MUST be level! Clean the top and edges of the stone with a cotton swab dipped in acetone or alcohol. All oil, including finger oil, needs to be removed.

13. Mix a small amount of clear two part epoxy. I use Hughes 330. I use small pieces of thick flexible plastic and a toothpick to mix the glue. Mix carefully, but bubbles are inevitable. Most are the result of out-gassing from the chemical reaction taking place, not from your mixing air into the glue - but do mix slowly and thoroughly so you don't mix a lot of air into the glue. Don't worry - the bubbles will be eliminated later.

Use equal amounts of the 2 parts

Lots of bubbles!! No sweat......
14. Let the mixed epoxy sit for a couple of minutes. See - fewer bubbles already. Pour the epoxy off the small piece of plastic and use a disposable kid's craft brush (I buy them in bulk from the craft supply store - real cheap) to scrap the glue off the plastic and on to the stone. Use the brush to encourage the glue to flow evenly over the stone and down the edges. Paint the edges with the brush to ensure the edges are coated with epoxy.

A bazillion small bubbles.... no big deal!
15. Ahhh..... the secret to epoxy bubble elimination!!

A Butane pencil torch!
16. After applying the epoxy to the stone, occasionally dab the edges with the brush, pick up drips on the base with the brush and let them drip onto the stone in spots that need a bit more glue, and use the brush to remove hanging drips from the bottom edge of the stone. Spend a few minutes on this touch-up and clean-up work. Then comes the torch! With the torch lit and on a low flame, gently play the torch over the surface of the epoxy from a distance of about 6 inches to a foot away. THE BUBBLES WILL DISAPPEAR!!! You will be dumbstruck (gob smacked, if your British) the first time you see this. It's amazing. Do not have the torch too close to the epoxy surface. Every torch is different. To judge the correct distance, place your hand in front of and far away from the flame, move the flame back and forth and move your hand closer until it just feels warm. Go ahead - it's just a little pencil torch.... not some honking bonfire. The distance will be about 6 to 12 inches. You may have to continue to do touch-up and drip clean-up with the brush every couple of minutes and you may need to repeat the torch trick.

You can't see the flame, but it is only about a 1/2"" long and is about 5-6 inches from the stone
OK - a little explanation about the bubble bursting. It's more chemistry stuff. It is not the heat from the torch that does the trick. It is a chemical reaction between the combustion gases from the torch and the epoxy that bursts the bubbles. It's mainly carbon monoxide and carbon dioxide that does it. In fact, you can perform this miracle without a torch by exhaling strongly with an open mouth onto the epoxy (not blowing with pursed lips). The carbon dioxide in your exhaled breath will work, but it takes much more huffing and puffing. Ok for one stone, but if you have a group to do you'll probably keel over trying to get rid of all the bubbles. Get a torch.

Clean and clear epoxy coat.
Let the epoxy cure at least one day. Three is best.
Part 2 next time.
Thursday, April 14, 2011
Grey Dog Trading Company
Grey Dog Trading Company is a small gallery shop in Tucson that sells Native American art; Navajo weavings, Hopi katsina dolls, Zuni fetishes, Navajo and Zuni jewelry, and Inuit stone carvings primarily. The shop is owned and operated by Kent and Laurie McManis, a couple of the very best people I have the privilege to know. Kent is a very well known and highly respected trader and recognized expert on Hopi katsina dolls and Zuni fetishes. He often judges at the three leading Native arts fairs at the Heard Museum in Phoenix, the Gallup Indian Fair, and Santa Fe Indian Market.
So what does this have to to do with Cabochon Designz? Not much really - but a little bit to do about rocks. I started working at the gallery part time last December and look forward to my one or two days a week in the shop. I love learning about native culture and their spiritual beliefs associated with the art. I got the gig partially due to my knowledge of rock types and can identify many of the materials used by the Zuni fetish carvers, as well as a decent working knowledge of Navajo weaving regional styles and weaving technique on the unique Navajo loom. Every month during the 'season' (winter here) we have an artist show where two or three artists come to the gallery for a two day show and sale. I have had the pleasure of meeting and talking with many of the leading native artists currently working. I love this gig!
Check out the gallery's website at: www.greydogtrading.com

Eagle by Dee Edaakie (Zuni) - Chiapas Amber

Badger by Bernie Laselute (Zuni) - Picasso Marble

Frog by Gabe Sice (Zuni) - Deer antler

Dancing Walrus by Alec Petooloosie (Iqaluit) - Serpentine

Ogre Woman by Loren Phillips (Hopi) - Cottonwood Root
Enjoy. Jim ...
Monday, April 11, 2011
OPAL DOUBLETS
I have been asked to update the blog. It has been quite a while since I have lasted posted something here. I will do better. I have been working on the opal rough - sorting, inspecting, pondering - and working on a few pieces. Most of what I purchased is thin seam material which will be made into doublets and triplets.


The doublets are made from selected flakes of the seam opal rough ground flat on what will become the bottom side. Once flat it is glued to a thin slab of black jade using epoxy which has been colored black. When dry and cured the excess backing is sliced off close to the opal using a thin blade diamond saw and the approximate outside shape of the opal is ground by hand on a diamond grinding wheel. The doublet is then mounted on a dop stick and the edges and top surface are sanded and polished using a series of diamond grinding wheels. The final high polish is achieved by polishing the opal (still on the dop) on a flat lap with Cerium Oxide slurry and then on a buffing wheel with polishing rouge. Once completed the opal is sanded thinner on the flat lap to an appropriate thickness.
You can see in the top two photos that the precious opal is a thin section glued to a thicker piece of black jade, while the bottom two photos show a nice gray base opal almost, but not quite, thick enough to stand on its own as a 'solid' opal. It is backed with a very thin piece of black jade to bring it up to proper thickness. Too bad too, because doublets are worth about 15-20% what solid opals are worth. In fact, when evaluating a doublet all it's qualities of body tone, brightness, color saturation, pattern, cut, carot weight and so forth are all judged as if the opal were a solid and the price then slashed by 80-85% to arrive at the price of the doublet. In other words the bottom opal is valued at $250-$500 retail if a solid or about $75 retail as a doublet. I have the opal priced at $45 wholesale as a cutter to a jewelry artisan.
Stay tuned. It makes sense to post a series of photos showing the steps I have described above. Then we will talk about evaluating the price of opals. Jim ...
Subscribe to:
Posts (Atom)